How To Enable And Disable USB Ports On Windows 10
Now that Windows 10 is omnipresent, it is likely that you may face day-to-day issues on this operating system. One of the most common issues with Windows 10 is the USB ports, which you may find a little tricky to switch on or off. Also, if you’ve got a new machine, you may have got the USB 3.0 mounted on it to enjoy a faster data transmission. If you know how to enable or disable USB ports on Windows 10, you can simply manage to control the ports on your own
It is also good to manage USB ports on a business machine to refrain users to connect any infected device to the machine. Today, we’ve come up with multiple ways on how to enable or disable USB ports on Windows 10:
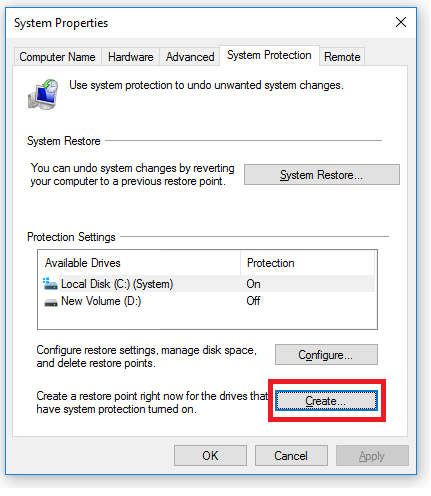
Note: Ensure that you create a System Restore Point by going into the System Information (Windows Key + Pause Break). From there, you can click on ‘System protection’ to open ‘System Properties’. Click on ‘System Protection’ tab and select ‘Create’ to get a restore point created for your computer.
How To Enable Or Disable USB Ports On Windows 10?
You may enable your computer’s USB ports on Windows 10 by using the ‘Device Manager’. Follow the below steps to tweak USB ports with Device Manager on Windows 10:
How To Enable Or Disable USB Ports From Registry?
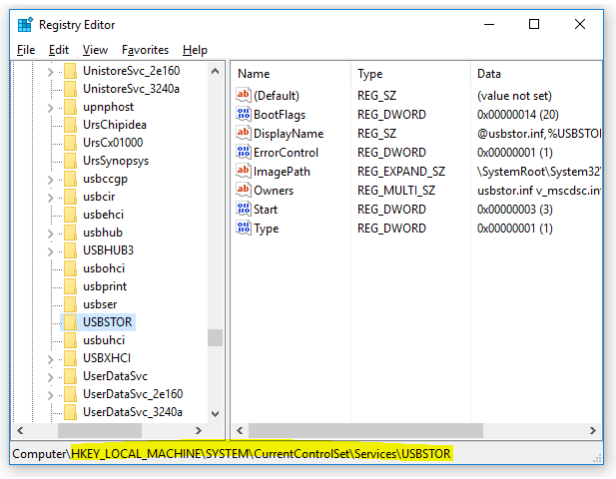
Using Registry to enable or disable USB ports is one of the strongest ways to make any change. However, it is important that you have relevant knowledge of the Registry or you may end up sabotaging your computer. You may follow the below steps to tweak Registry:
HKEY_LOCAL_MACHINE\SYSTEM\CurrentControlSet\ Services\USBSTOR
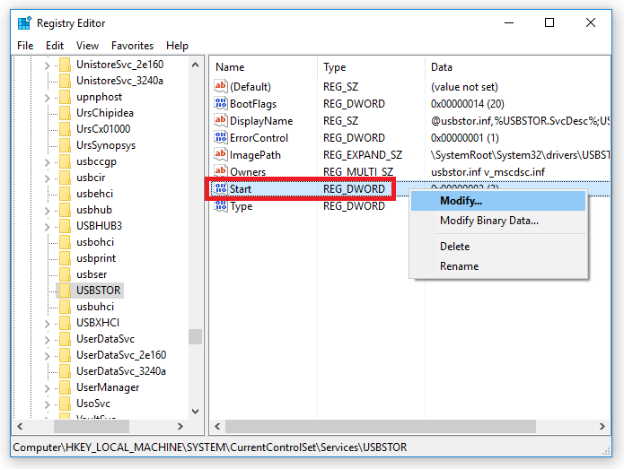
-
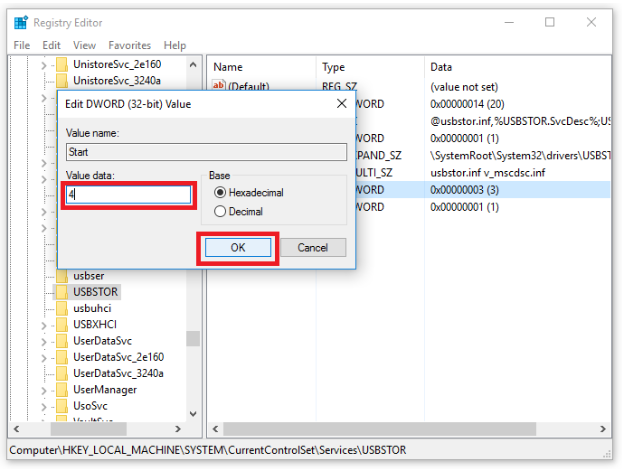
Once you’ve got the Editable window, you can change the value to turn on or off the USB ports. If you wish to disable the USB port, change the value from ‘3’ to ‘4’. Else, change it to ‘4’ from ‘3’ to enable
How To Enable Or Disable USB Ports Through A Utility?
When you’re unsure about getting into technical details, it is always better to have a dedicated tool for the specific task. Fortunately, there are myriads of tools to help you enable or disable USB ports. SysTools USB Blocker is one amongst the best tools to turn on and off USB ports on Windows 10. The tool is intuitive and user-friendly that doesn’t require much engagement from you. Just install the tool and control USB ports with a simple click. If the tool doesn’t fit to your needs, you may download any other software to enable or disable USB ports from the internet.

How To Enable Or Disable USB Ports Through BIOS?
When you’re concerned about your data, it is always the best to shut down all the possibilities that may play a part in data theft. One of the best ways to enable or disable USB ports is through the BIOS. The BIOS stands for Basic Input Output System, which is a set of instructions in firmware controlling input and output operations. You may follow the below steps to control USB ports with BIOS:
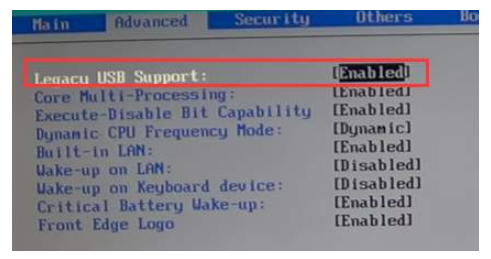
IMG SRC: Driver Easy
It is important to know that your computer may not respond to F1 to get into the BIOS setup and F10 to save and exit. Commands may vary for each computer. It is important to refer to the manual guide to know the responding commands for your machine.

Taking everything into account, it is clear that you can easily control the USB ports on your Windows 10 machine. Note that you would require an administrator account to make any above listed changes. Now that you are aware of the multiple ways to turn on and off the USB ports, it is time to apply the methods to enjoy the privilege of controlling USB ports and secure the system. If you’ve got some other interesting ways on how to enable and disable USB ports on Windows 10, do let us know in the comments below.
Tips to Prevent virus and malware from Infecting Your System:
- Enable your popup blocker: Pop-ups and ads on the websites are the most adoptable tactic used by cybercriminals or developers with the core intention to spread malicious programs.
So, avoid clicking uncertain sites, software offers, pop-ups etc. and Install a powerful ad- blocker for Chrome, Mozilla, and IE
- Keep your Windows Updated: To avoid such infections, we recommend that you should always keep your system updated through automatic windows update.By doing this you can keep your device free from virus.According to the survey, outdated/older versions of Windows operating system are an easy target.
- Third-party installation: Try to avoid freeware download websites as they usually install bundled of software with any installer or stub file.
- Regular Backup: Regular and periodical backup helps you to keep your data safe in case the system is infected by any kind of virus or any other infection.Thus always backup important files regularly on a cloud drive or an external hard drive.
- Always have an Anti-Virus: Precaution is better than cure. We recommend that you install an antivirus like ITL Total Security or a good Malware Removal Tool like Download Virus RemovalTool
