When it comes to the transferring photos, music or other media from your iPhone to your PC, the whole process becomes hefty and complicated. This brings a hindrance to your usual workflow and degrades the overall user experience.
So, today, we'll introduce 3 free yet easy ways to transfer your iPhone photos to PC without iTunes.
Part 1: Transfer iPhone photos to PC with iCloud
iCloud is another important part of the iOS suit offered by Apple but is very much open and cleaner in its approach and media management in comparison to the iTunes service offered by Apple.
Preparation: Download iCloud, install and run it on your PC.
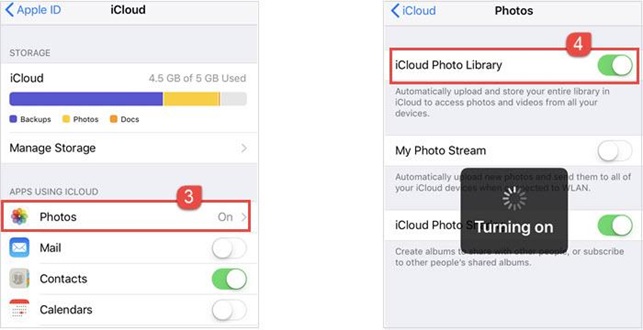
Step 1. Go to Settings > turn on "iCloud Photo Library" on your iPhone.
Step 2. Sign in to iCloud with the same Apple ID you used to set up iCloud on your iPhone.
Step 3. Click Options and check the iCloud Photo Library checkbox plus any other options such as My Photo Stream, iCloud Photo Sharing etc. and click Done. All your photos will be auto synced iCloud Photo Library, and then iCloud automatically downloads a copy of the photos to your PC.
Also See: How to Scan iPhone for virus

Pros:
- Free store photos and other file for 5GB.
Cons:
- When exceed 5GB storage, you have to pay for more storage
- Complicated, may have data erasing risk.
Part 2: Transfer iPhone photos to PC (or vice versa) with WinX MediaTrans
With WinX MediaTrans, you can transfer photos from your iPhones to PC or sync photos from PC to your iPhone in an extremely fast speed. This free iPhone photo transfer software supports a range of image formats, like JPG/PNG/GIF/BMP/TIFF/HEIC (HEIF) formats. You can also view and transfer photos according to different days/month/year, or photo albums.
Following's how to transferring photos from iPhone to PC:
Preparation: Free download and install WinX MediaTrans.
Step 1. Open WinX MediaTrans and connect your iPhone with PC via a USB cable.
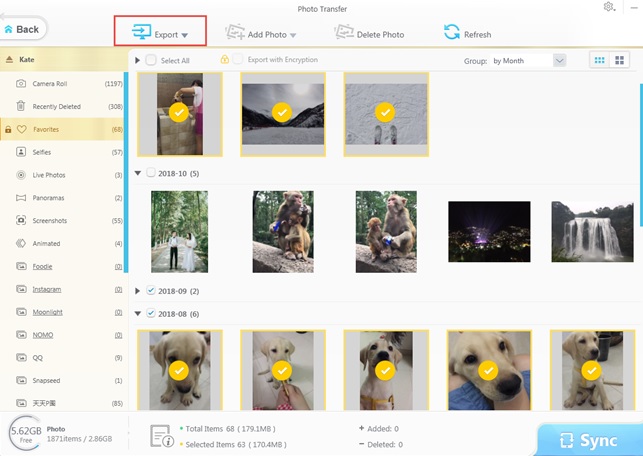
Step 2. Click "Photo Transfer" on the main interface, then you can see all the photos on your iPhone.
Step 3. Select the photos you want to transfer and click "Export" to transfer them to PC.

That’s it. WinX MediaTrans does the rest for you in a snap of fingers. Thanks to the hardware acceleration tech, you can transfer 100 4K photos in just 8 seconds.
Also See: Apple To Make a Dual Sim iPhone This Year?
Pros:
- Support transferring photos in different formats
- Support transferring photos in different folders
- Two-way transfer, transfer photo from iPhone to PC, or PC to iPhone
- Easy, fast, no data erasing risk.
- Transfer other files: music, videos, ebooks, etc. Auto convert video audio format to fit iPhone, iPad, iPod, make ringtone, etc.
Cons:
Free trial only lets you transfer 30 photos/music/videos, etc from iPhone to PC, or PC to iPhone everyday.
Part 3: Transfer iPhone photos to PC with Autoplay
The second free way to transfer iPhone photos to PC is the Autoplay feature.
Step 1: Connect your iPhone with your PC with a USB, a dialog box pops up on the screen asking you on how to proceed with the connected device.
If in certain circumstances, the pop up doesn’t come and there is no way to import the photos, in such cases just go to the Cortana search and search and open “Photos” app to import the photos. Just select the “Import” option and choose the USB device as a source to import the photos. This automatically starts loading the photos from your iPhone to your PC.
Step 2. Select “Import pictures and videos”, and adjust the destination location as per the requirements to transfer all photos from your iPhone to your PC.

Pros:
- Free, no need to install a software
Cons:
- You cannot view and select photos to transfer via different albums.
- One-way transfer: only support transfer photo from iPhone to PC.
Conclusion
Above is the three free and popular ways to transfer photos from iPhone to PC, you can choose the method according to your own needs.
Tips to Prevent virus and malware from Infecting Your System:
- Enable your popup blocker: Pop-ups and ads on the websites are the most adoptable tactic used by cybercriminals or developers with the core intention to spread malicious programs.
So, avoid clicking uncertain sites, software offers, pop-ups etc. and Install a powerful ad- blocker for Chrome, Mozilla, and IE
- Keep your Windows Updated: To avoid such infections, we recommend that you should always keep your system updated through automatic windows update.By doing this you can keep your device free from virus.According to the survey, outdated/older versions of Windows operating system are an easy target.
- Third-party installation: Try to avoid freeware download websites as they usually install bundled of software with any installer or stub file.
- Regular Backup: Regular and periodical backup helps you to keep your data safe in case the system is infected by any kind of virus or any other infection.Thus always backup important files regularly on a cloud drive or an external hard drive.
- Always have an Anti-Virus: Precaution is better than cure. We recommend that you install an antivirus like ITL Total Security or a good Malware Removal Tool like Download Virus RemovalTool
